
Splitting your app into smaller apps using RabbitMQ
After many years of development, we realized our app had become too complex, causing development, testing and debugging to be much harder. We decided to do something about it and the first step needed to solve this problem was splitting our app into smaller apps—starting with extracting the messaging mailer, which is responsible for sending all our messages to clients as a separate app. For this purpose, RabbitMQ was chosen as a broker.
A couple words about RabbitMQ
RabbitMQ is a broker for the AMQP (Advanced Message Queuing Protocol) – Messaging Broker
Reasons for using messaging in your applications
- Reduce complexity by decoupling and isolating applications
- Build smaller apps that are easier to develop, debug, test, and scale
- Build multiple apps that each use the most suitable language or framework versus one big monolithic app
- Get robustness and reliability through message queue persistence
- Reduce system sensitivity to downtime
Before we start I suggest you to read this post: Event sourcing on Rails with RabbitMQ. This helped me a lot when I was just starting to learn this technology and explain in details all the things I am not going to talk about for the sake of simplicity. Also, it would be a good idea to read about bunny and sneakers gems, and RabbitMQ official documentation.
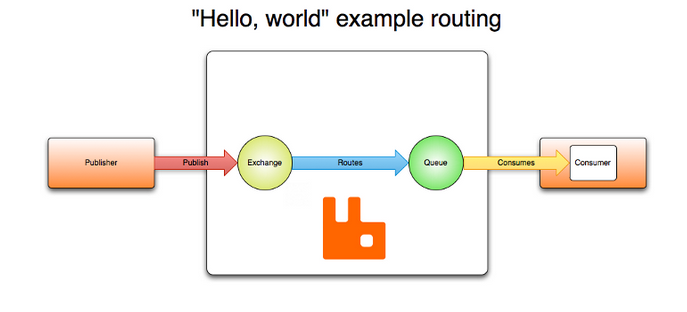
To better understand the whole process, I will define a couple of things:
Publisher
- The first app (publisher) called ‘dashboard’ uses ‘message_publisher’ for delivering messages to the broker via a ‘dashboard.messages’ exchange.
- The name of the exchange for dashboards is called ‘dashboard.messages,’ which is a direct exchange—for detailed explanations of different types of exchanges, look at https://www.RabbitMQ.com/tutorials/amqp-concepts.html
- ‘bunny’ gem (https://github.com/ruby-amqp/bunny) was used for publishing messages (Bunny is a popular, easy-to-use, well-maintained Ruby client for RabbitMQ)
creating publisher
  # '../lib/publishers/message_publisher.rb'
  class Publishers::MessagePublisher
    def self.publish(message)
      x = channel.direct("dashboard.messages")
      x.publish(message.as_json, :persistent => true, :routing_key => '#')
    end

    def self.channel
      @channel ||= connection.create_channel
    end

    def self.connection
      @conn = Bunny.new(APP_CONFIG['rabbitmq.amqp']) # getting configuration from rabbitmq.yml
      @conn.start
    end
  end
RabbitMQ configuration
  # '../config/rabbitmq.yml'
  rabbitmq:
    development:
      amqp: "amqp://guest:guest@localhost:5672"

    # integration:
    #  amqp: ...

    # production:
    #  amqp: ...
creating and sending message to broker via publisher
  class Message < ActiveRecord::Base
    # ...

    after_commit publish_message, on: :create

    # ...

   def publish_message
     Publishers::MessagePublisher.publish(self)
   end
Consumer
- Second app(consumer) called ‘mailer’ which consumes messages received from broker and sends them to clients using Action mailer.
- Name of queue ‘mailer.messages’
- ‘sneakers’ gem - https://github.com/jondot/sneakers, was used for consuming messages (A fast background processing framework for Ruby and RabbitMQ)
creating worker to consume messages
  # '..app/workers/messages_worker.rb'
  class MessagesWorker
    include Sneakers::Worker

    from_queue  'cliche.messages'

    def work(message)
      MyMailer.send_mail(msg).deliver


      ack!
  end
RabbitMQ configuration
  # '..config/rabbitmq.yml'
  development:
    amqp: "amqp://guest:guest@localhost:5672"
    vhost: "/"

  # integration:
  #   amqp: ...

  #production:
  #   amqp: ...
Connecting it all together
rake task to create binding between producer and consumer
  namespace :rabbitmq do
    desc "Setup routing"
    task :setup do
      require "bunny"

      conn = Bunny.new
      conn.start

      ch = conn.create_channel

      # get or create exchange
      x = ch.direct('dashboard.messages', :persistent => true)

      # get or create queue (note the durable setting)
      queue = ch.queue('mailer.messages', :durable => true, :ack => true, :routing_key => '#')

      # bind queue to exchange
      queue.bind('vcita.messages', :routing_key => '#')

      conn.close
    end
  end
Installing and running it all together
- Installation of RabbitMQ - brew install rabbitmq
- Run RabbitMQ broker - /usr/local/opt/rabbitmq/sbin/rabbitmq-server
- Open dashboard’s directory - cd Projects/dashboard ( in my case ) and run rake task for binding - rake rabbitmq:setup
- Open mailers’s directory - cd Projects/mailer ( in my case ) and run sneakers worker - WORKERS=MessagesWorker rake sneakers:run
- Check RabbitMQ’s admin is alive - http://localhost:15672, check via admin bindings properly configured between exchange and queue
In coming articles, I will talk about error handling in consumer using sneaker’s failure handlers and what we do in producer in case the connection to the broker is lost for some reason. I hope this helps somebody to better understand how all things are connected and working together, or that I’ve at least provided a starting point.

Leave a comment