
Perfect PR process on Github with Jenkins CI, multi-branch pipeline, and autostatus plugin

As a DevOps engineer at Cloudify.co I am building a new CI/CD pipeline based on Kubernetes and Jenkins, I am also migrating jobs from CircleCi to Jenkins and one of the things I liked in CircleCI is the status returned to Pull request on Github for every stage of the pipeline.
This is how it looks like
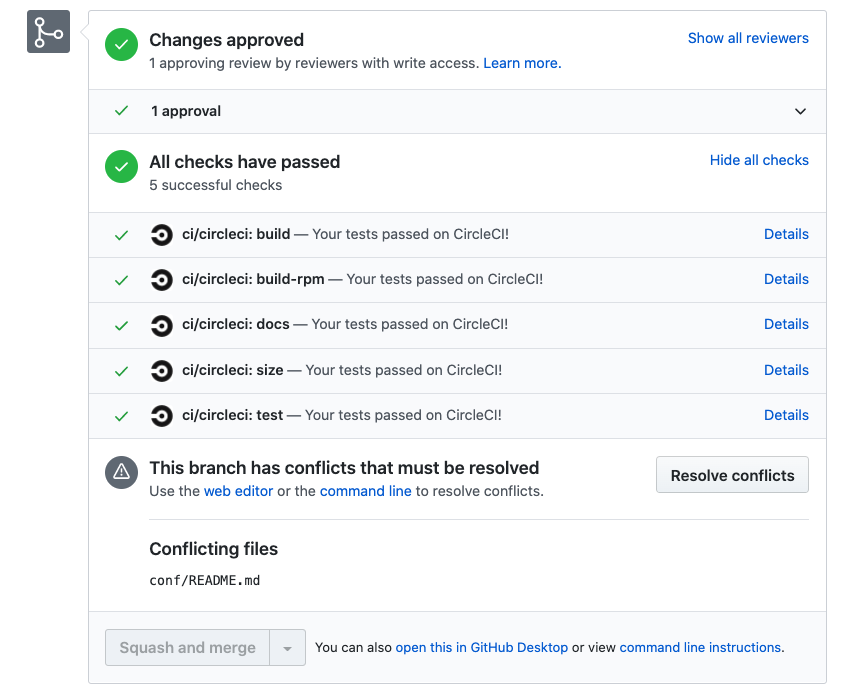
As you can see for each stage: build / build-rpm / docs / size / test CircleCI returns status, meaning status per stage.
Looks good, but how can you implement this kind of behavior in Jenkins with the multibranch pipeline?
Struggling to find the answer to these questions I came up with this solution, which I will showcase in this post.
Don’t get me wrong I found different posts on how you can do it using GitHub API directly or through plugins like githubnotify-step, but you need to add it manually for each stage/step of a pipeline which is good but far from being perfect.
Let’s begin
In this post, I will show you how to configure Jenkins, Github, and different plugins to beautify your PR (Pull Request) process on Github and using the Jenkins CI.
What is Jenkins?
Jenkins is a self-contained, open source automation server which can be used to automate all sorts of tasks related to building, testing, and delivering or deploying software.
What is Multibranch pipeline?
The Multibranch Pipeline project type enables you to implement different Jenkinsfiles for different branches of the same project. In a Multibranch Pipeline project, Jenkins automatically discovers, manages and executes Pipelines for branches which contain a Jenkinsfile in source control. This eliminates the need for manual Pipeline creation and management.
What is Github autostatus plugin?
This plugin automatically sends status notification for all stages in any pipeline job. You can configure the plugin to send status information to:
Github, to see per-stage build status from the PR page InfluxDb or StatsD (for automatic monitoring of build health) for any pipeline job
Prerequisites
Kubernetes cluster must be installed with helm and tiller.
Install Jenkins to your Kubernetes cluster
In my case, it’s an EKS cluster with Kubernetes version 1.15
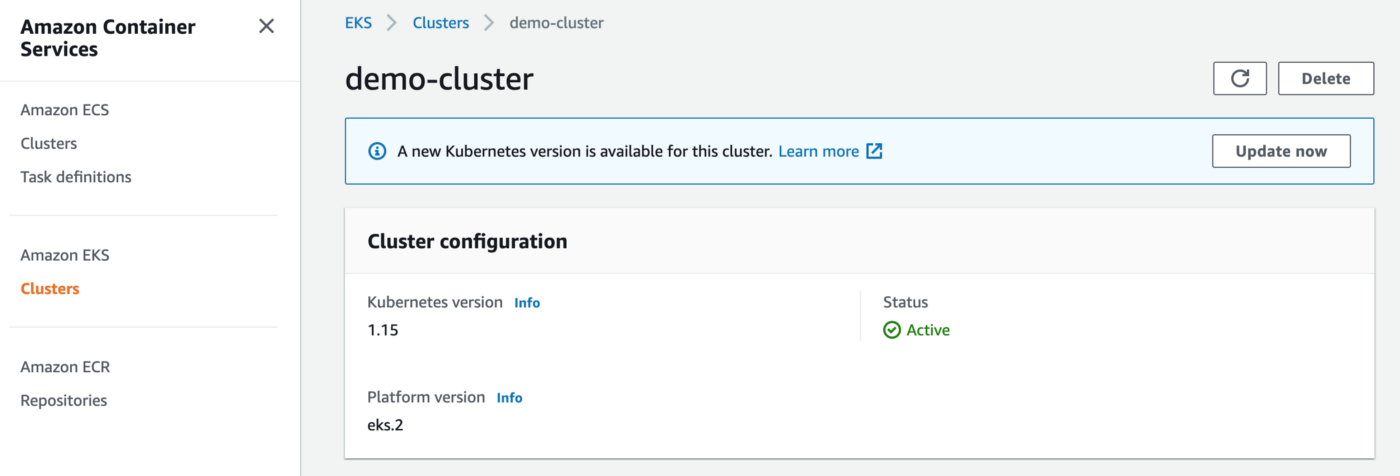
For demo purposes, you can quickly create EKS cluster on AWS using the eksctl utility
eksctl create cluster \
  --version 1.15 \
  --region us-west-2 \
  --node-type t3.medium \
  --nodes 1 \
  --nodes-min 1 \
  --nodes-max 1 \
  --name demo-cluster \
The purpose of this post is not to create the Kubernetes cluster, so I will not focus on that. (you can write in comments if it’s interesting and I will write a post on this topic separately)
Install the Jenkins on Kubernetes cluster with helm
kubectl create ns jenkins
helm install jenkins stable/jenkins --set master.serviceType=LoadBalancer --namespace jenkins
I will use Jenkins helm chart to install it to EKS cluster
I use -set master.serviceType=LoadBalancer flag to create a Load balancer on AWS which points to Jenkins, this way Jenkins will be publicly available and we can use Github webhook to send post requests on each push to Jenkins. Use ‘kubectl get services’ to get the domain name for your created load balancer/Public IP

Helm is the package manager for Kubernetes
Creating a repository with the Jenkins multibranch pipeline
For demo purposes, I will use a simple python(Flask) app with a test and Jenkinsfile, I am also using Jenkins Kubernetes plugin
pipeline {
  agent {
    kubernetes {
      label 'ci'
      defaultContainer 'jnlp'
      yamlFile 'build-pod.yaml'
    }
  }
  stages {
    stage('Build') {
      steps {
        echo 'BRANCH NAME: ' + env.BRANCH_NAME
        echo sh(returnStdout: true, script: 'env')

        container('python') {
          sh 'pip install -r requirements.txt'
        }
      }
    }
    stage('Run Unit Tests') {
      steps {
        echo 'CHANGE_ID: ' + env.CHANGE_ID
        container('python') {
          catchError(buildResult: 'SUCCESS', stageResult: 'FAILURE') {
            sh 'python test.py'
          }
        }
      }
    }
    stage('Run RPMS') {
      steps {
        echo 'ALL ENV:'
        echo sh(returnStdout: true, script: 'env')
        container('python') {
          catchError(buildResult: 'SUCCESS', stageResult: 'FAILURE') {
            sh "exit 1"
          }
        }
      }
    }
    stage('Run flake8') {
      steps {
        echo 'CHANGE_URL: ' + env.CHANGE_URL
        container('python') {
          sh 'echo "Run flake8"'
        }
      }
    }
    stage('Check for compatability with python 3') {
      steps {
        echo 'CHANGE_TITLE: ' + env.CHANGE_TITLE
        catchError(buildResult: 'SUCCESS', stageResult: 'FAILURE') {
          sh "exit 1"
        }
      }
    }
  }
}
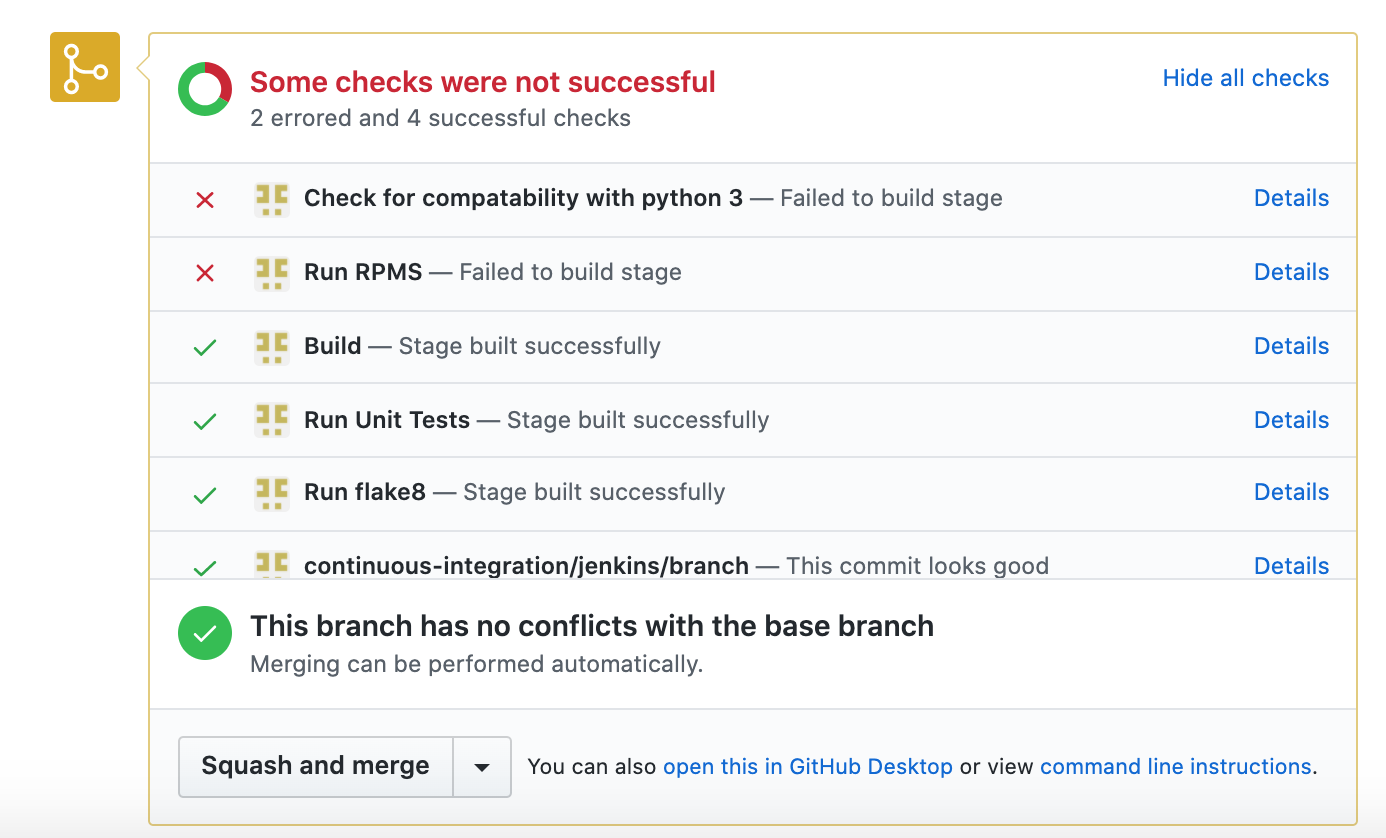
I am failing ‘Run RPMS’ and ‘’Check for compatibility with python 3’ stages on purpose, to see how it looks withing the Pull Request after notifications from the plugin received.
You can find here all the code here
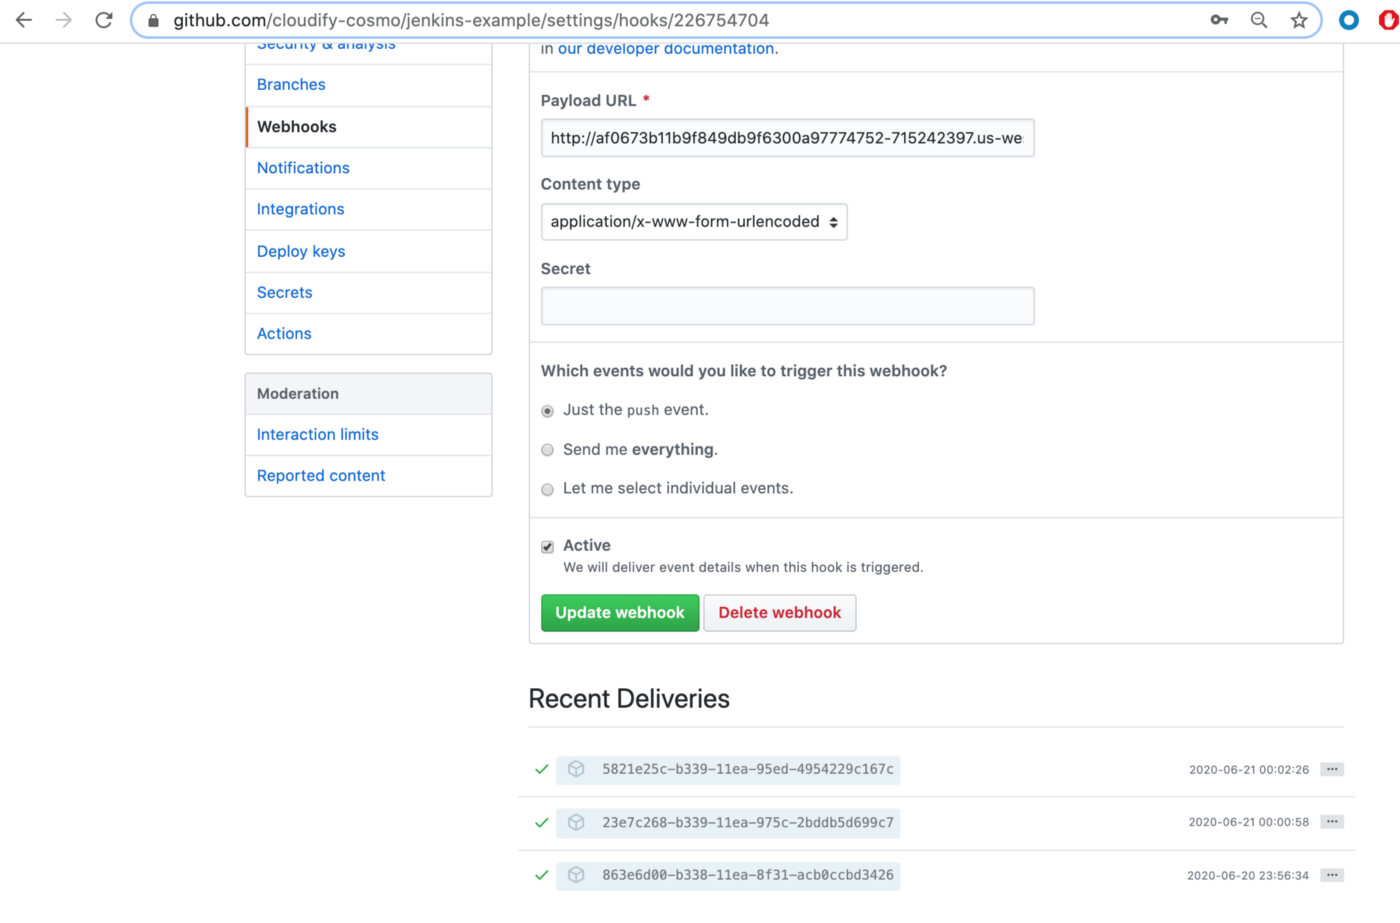
Add the webhook to Github
Go to the settings tab in your GitHub repository and add the webhook
https://github.com/cloudify-cosmo/jenkins-example/settings/hooks
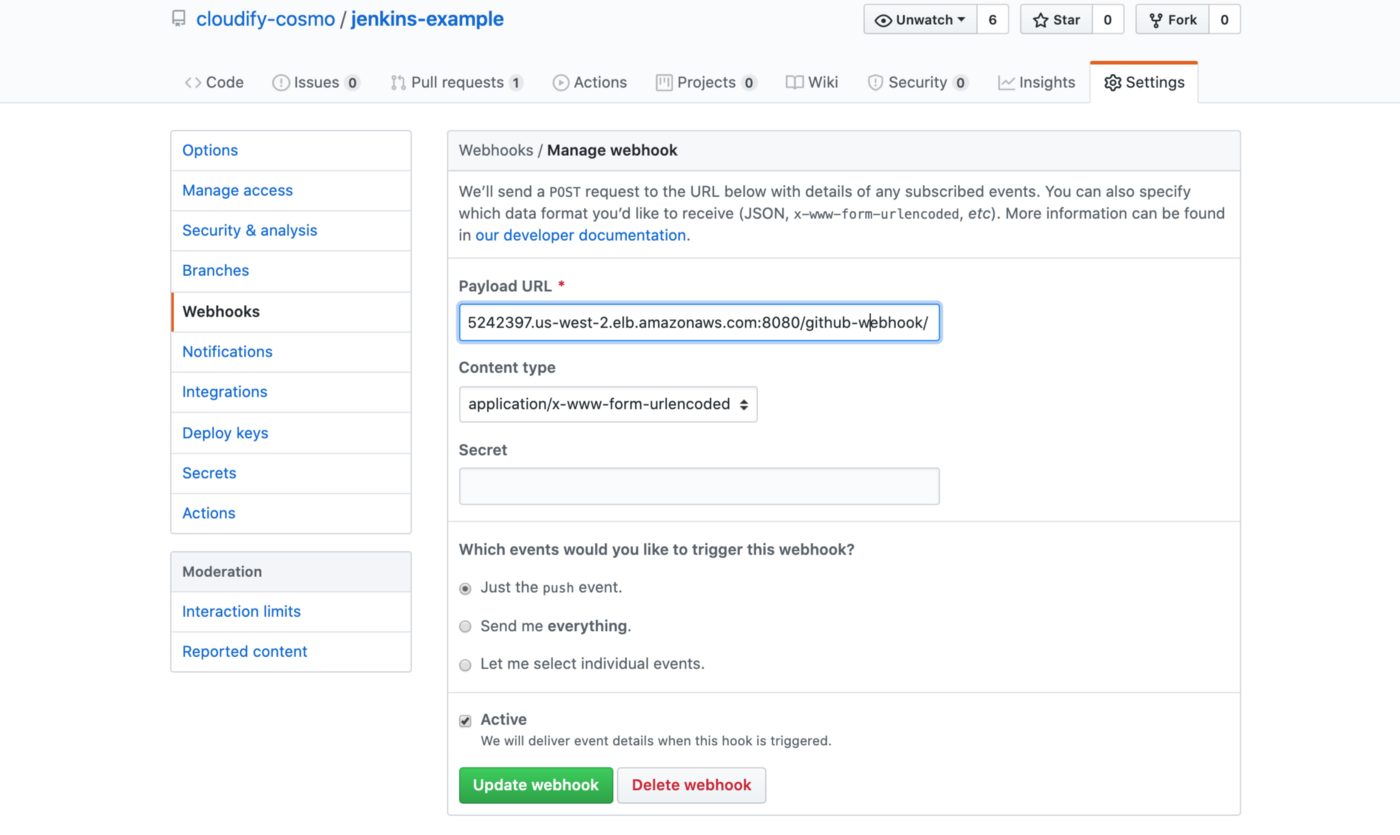
In my case, the webhook is:
http://af0673b11b9f849db9f6300a97774752-715242397.us-west-2.elb.amazonaws.com:8080/github-webhook/ af0673b11b9f849db9f6300a97774752–715242397.us-west-2.elb.amazonaws.com:8080
Is automatically generated domain name for Load Balancer you created in AWS, which points to Jenkins
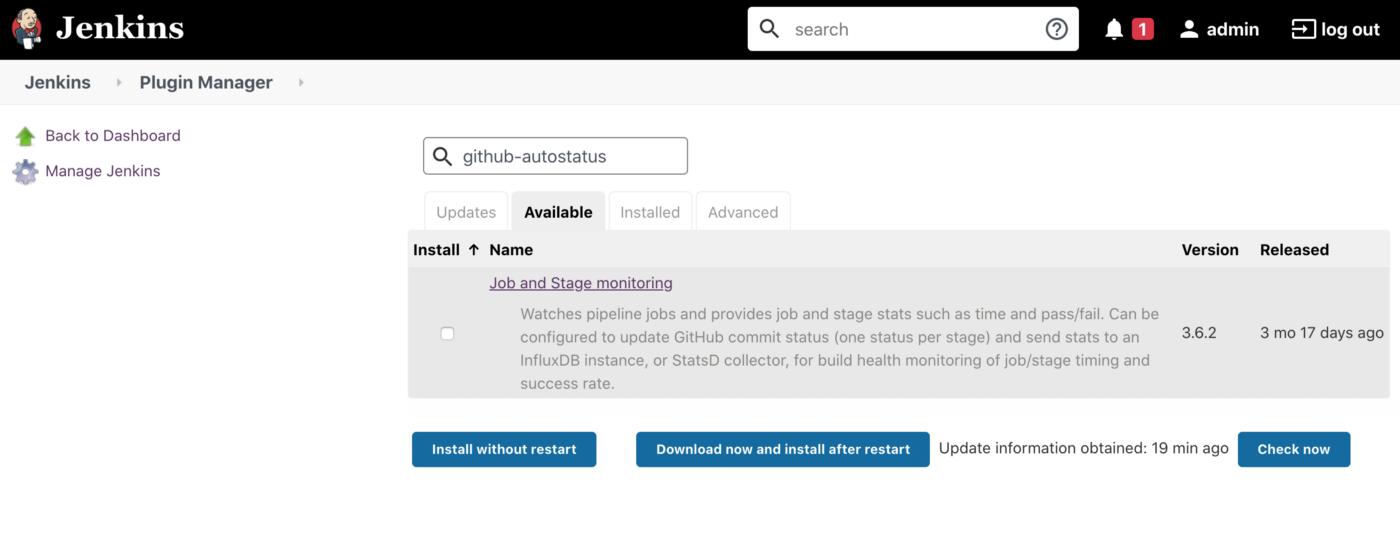
Installing the github-autostatus plugin
Go to Jenkins -> Manage Jenkins -> Manage Plugins -> Available and install the plugin without the restart
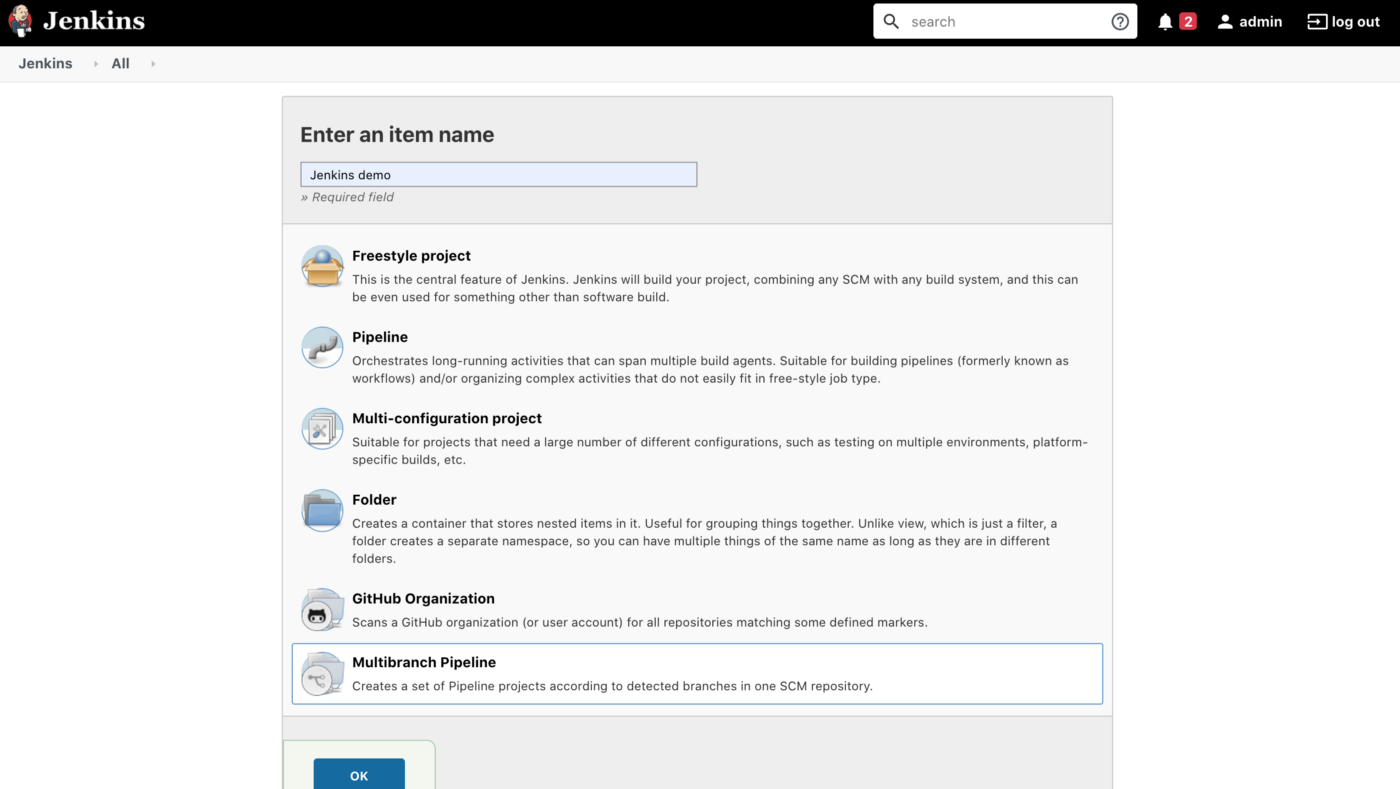
Create Multibranch pipeline job
Jenkins → New Item
Select multibranch pipeline
Configure the job: Select in ‘Branch Sources’ the Github, add repository URL ( if your repository is private you need to create credentials in Jenkins to access repository).
It’s recommended to create and use credentials with Github.
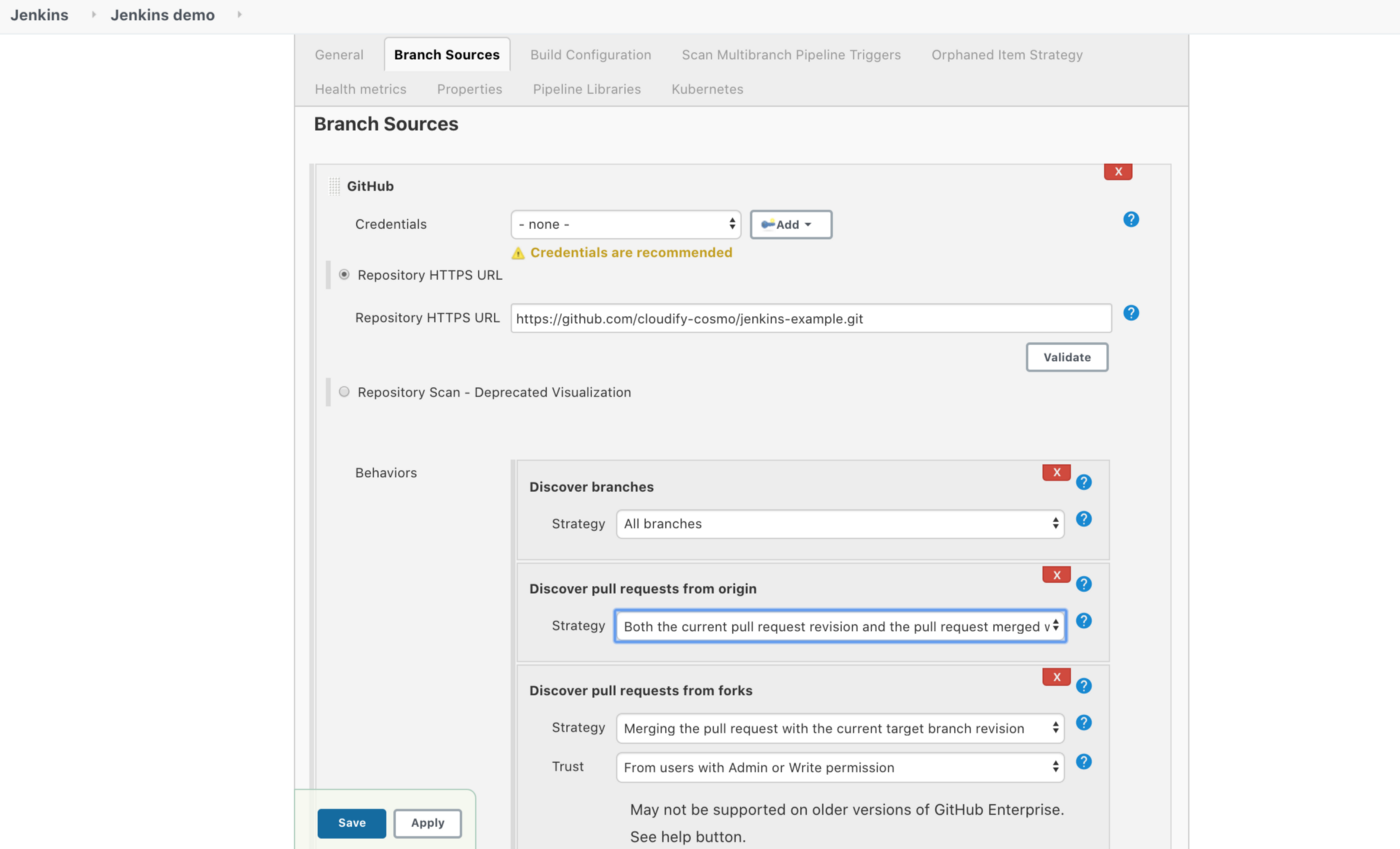
Then the repository will be scanned and builds executed if needed.
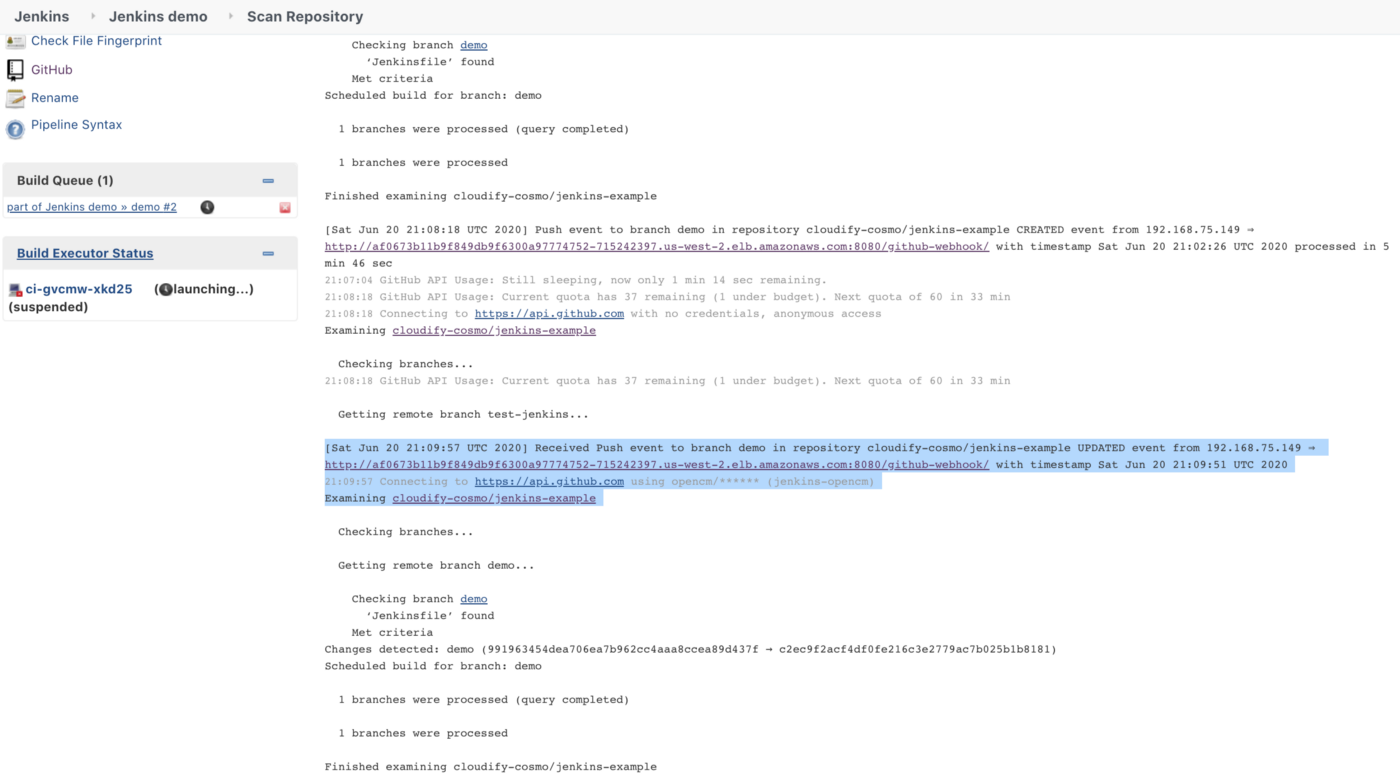
Checking the integration between Github and Jenkins job
Let’s create a new branch and open the PR in our repository
Then check the webhook deliveries, you must see recent deliveries
Then go to your job in Jenkins -> Multibranch Pipeline Events
You must see in the log that notifications were received
And finally, you must see something similar to this in your PR
You can also find my article on medium: Perfect PR process on Github with Jenkins CI, multi-branch pipeline, and autostatus plugin
For consulting gigs you can reach me on Upwork
Thank you for reading and hope it was valuable for you!
Leave a comment