
Building the CI/CD of the Future, NGINX Ingress + Cert-Manager
In this tutorial, I will share my experience as a DevOps engineer at Cloudify.co, this is the fourth post of the tutorial in which I will describe how to add NGINX Ingress and Cert-Manager to the EKS cluster we created in the previous posts.
Building the CI/CD of the Future published posts:
- Introduction
- Creating the VPC for EKS cluster
- Creating the EKS cluster
- Adding the Cluster Autoscaler
- Add Ingress Nginx and Cert-Manager
- Install and configure Jenkins
- Create your first pipeline
Let’s start.
What is Ingress?
Ingress exposes HTTP and HTTPS routes from outside the cluster to services within the cluster. Traffic routing is controlled by rules defined on the Ingress resource.
internet |
[ Ingress ]
–|—–|–
[ Services ]
An Ingress may be configured to give Services externally-reachable URLs, load balance traffic, terminate SSL / TLS, and offer name based virtual hosting. An Ingress controller is responsible for fulfilling the Ingress, usually with a load balancer, though it may also configure your edge router or additional frontends to help handle the traffic.
https://kubernetes.io/docs/concepts/services-networking/ingress/
What is NGINX Ingress?
ingress-nginx is an Ingress controller for Kubernetes using NGINX as a reverse proxy and load balancer.
https://github.com/kubernetes/ingress-nginx

To install Nginx Ingress we will use the Helm package manager.
Install Helm package manager
Helm is a package manager for Kubernetes that allows developers and operators to more easily package, configure, and deploy applications and services onto Kubernetes clusters.
Follow this reference to install Helm, I installed helm on my mac using the homebrew:
brew install helm
I am using helm v3 in this tutorial
Adding the Stable Repo to Helm v3
helm repo add stable https://kubernetes-charts.storage.googleapis.com/
Install the NGINX Ingress
Let’s create an ‘ingress-nginx’ namespace to which ingress-nginx will be installed using helm.
kubectl create ns ingress-nginx
helm install ingress-nginx stable/nginx-ingress -n ingress-nginx


You can see a service of the LoadBalancer type created, which will be the entry point to our EKS cluster:

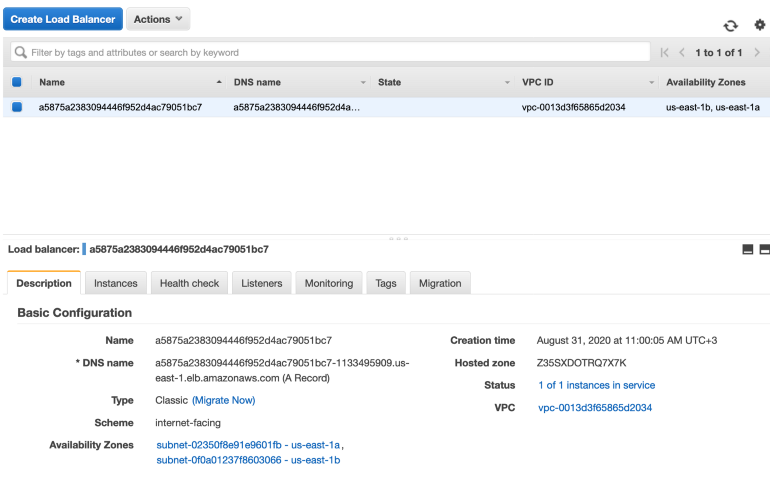
DNS name of created LB is: a5875a2383094446f952d4ac79051bc7–1133495909.us-east-1.elb.amazonaws.com
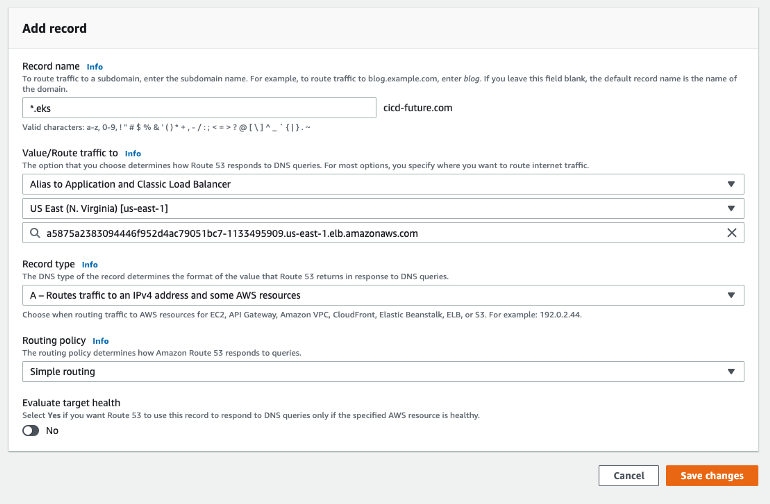
Create the DNS record which points to our EKS cluster
Let’s assume our domain is: cicd-future.com
Our EKS cluster’s domain is: eks.cicd-future.com
We need to add A record *.eks.cicd-future.com which points to created LoadBalancer service, it’s basically an alias which points to created LB by Ingress
If you use route53 of AWS go to Route53 -> Hosted Zones -> ‘cicd-future.com’ and add new A record which points to created LB
To check you defined correctly A record, use ‘dig’
dig eks.cicd-future.com
‘A’ records returned by ‘dig eks.cicd-future.com’ and ‘dig a5875a2383094446f952d4ac79051bc7–1133495909.us-east-1.elb.amazonaws.com’ must be the same.
curl eks.cicd-future.com
default backend - 404%
Standard response for NGINX ingress if rule not defined.
Validating EKS cluster reachable through DNS
To test everything configured properly we will deploy a simple Nginx server with ingress rule:
kubectl run nginx --image nginx
kubectl expose deploy nginx --port 80
Save and deploy the NGINX Ingress rule:
Save as ingress-nginx.yaml
apiVersion: extensions/v1beta1
kind: Ingress
metadata:
  name: nginx-test
  annotations:
    kubernetes.io/ingress.class: "nginx"
spec:
  rules:
  - host: test.eks.cicd-future.com
    http:
      paths:
      - path: /
        backend:
          serviceName: nginx
          servicePort: 80
Deploy ingress rule
kubectl create -f ingress-nginx.yaml
Let’s check the response with curl:
curl test.eks.cicd-future.com


<!DOCTYPE html>
<html>
<head>
<title>Welcome to nginx!</title>
<style>
    body {
        width: 35em;
        margin: 0 auto;
        font-family: Tahoma, Verdana, Arial, sans-serif;
    }
</style>
</head>
<body>
<h1>Welcome to nginx!</h1>
<p>If you see this page, the nginx web server is successfully installed and
working. Further configuration is required.</p>
<p>For online documentation and support please refer to
<a href="http://nginx.org/">nginx.org</a>.<br/>
Commercial support is available at
<a href="http://nginx.com/">nginx.com</a>.</p>
<p><em>Thank you for using nginx.</em></p>
</body>
</html>
Looks good, everything working properly.
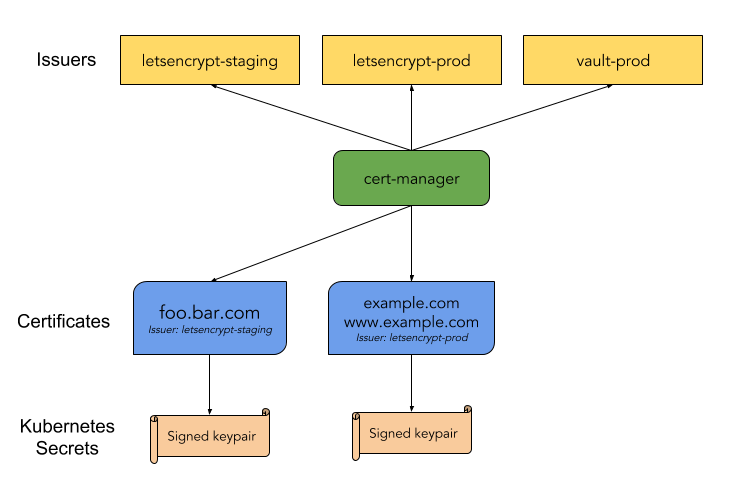
What is Cert-Manager?
cert-manager is a native Kubernetes certificate management controller. It can help with issuing certificates from a variety of sources, such as Let’s Encrypt, HashiCorp Vault, Venafi, a simple signing key pair, or self signed.
It will ensure certificates are valid and up to date, and attempt to renew certificates at a configured time before expiry.
https://cert-manager.io/docs/
Install cert-manager to our EKS cluster with helm
https://cert-manager.io/docs/installation/kubernetes/
Create the namespace, add helm repository and install cert-manager
Create cert-manager namespace
kubectl create namespace cert-manager
Add the Jetstack Helm repository
helm repo add jetstack https://charts.jetstack.io
Update your local Helm chart repository cache
helm repo update
Install needed CRDs
kubectl apply --validate=false -f https://raw.githubusercontent.com/jetstack/cert-manager/release-0.14/deploy/manifests/00-crds.yaml
Install using helm v3+
helm install \
  cert-manager jetstack/cert-manager \
  --namespace cert-manager \
  --version v0.14
Verifying the installation
kubectl get pods --namespace cert-manager

NAME                                       READY   STATUS    RESTARTS   AGE
cert-manager-5c6866597-zw7kh               1/1     Running   0          2m
cert-manager-cainjector-577f6d9fd7-tr77l   1/1     Running   0          2m
cert-manager-webhook-787858fcdb-nlzsq      1/1     Running   0
You should see the cert-manager, cert-manager-cainjector, and cert-manager-webhook pod in a Running state. It may take a minute or so for the TLS assets required for the webhook to function to be provisioned. This may cause the webhook to take a while longer to start for the first time than other pods. If you experience problems, please check the FAQ guide.
Configure Cluster Issuer to issue Let’s Encrypt certificates
To obtain Let’s Encrypt certificates we need to create an issuer, it may be Issuer or ClusterIssuer, the difference is that an Issuer is scoped to a single namespace and ClusterIssuer is a cluster-wide version of an Issuer.
Let’s Encrypt Issuer have staging and production environments, you can start with staging issuer for testing, it has more appropriate(extended) rate limits for testing, but I will concentrate in this tutorial on the creation of production ClusterIssuer:
apiVersion: cert-manager.io/v1alpha3
kind: ClusterIssuer
metadata:
  name: letsencrypt-prod
spec:
  acme:
    # The ACME server URL
    server: https://acme-v02.api.letsencrypt.org/directory
    # Email address used for ACME registration
    email: [email protected]
    # Name of a secret used to store the ACME account private key
    privateKeySecretRef:
      name: letsencrypt-prod
    # Enable the HTTP-01 challenge provider
    solvers:
    - http01:
        ingress:
          class: nginx
We using HTTP Validation and ACME protocol for ClusterIssuer
Deploy clusterissuer.yaml
kubectl create -f clusterissuer.yaml
Issue a new Let’s Encrypt certificate for test.eks.cicd-future.com
To issue a new certificate we will modify the ingress rule for ‘nginx’ server, pay attention to ‘annotations’ and ‘tls’ parts.
apiVersion: extensions/v1beta1
kind: Ingress
metadata:
  name: nginx-test
  annotations:
    kubernetes.io/ingress.class: "nginx"
    cert-manager.io/cluster-issuer: "letsencrypt-prod"
spec:
  tls:
  - hosts:
    - test.eks.cicd-future.com
    secretName: test-tls-prod
  rules:
  - host: test.eks.cicd-future.com
    http:
      paths:
      - path: /
        backend:
          serviceName: nginx
          servicePort: 80
kubectl create -f my-ingress.yaml
Now you need to wait till Cert-Manager acquires a certificate for the test.eks.cicd-future.com domain, it may take some time. When the certificate will be acquired you will be able to reach test.eks.cicd-future.com using the HTTPS.
You can check acquired certificates and status using ‘kubectl’:
kubectl get certificates -n cert-manager
In this post, I explained how to install and configure NGINX Ingress for your EKS cluster, create a DNS record with route53 which points to your EKS cluster, how to install and configure Cert-Manager with ClusterIssuer and Let’s Encrypt certificates.
Please follow me on Twitter (@warolv)
I will save all configuration created in this tutorial in my Github
For consulting gigs you can reach me on Upwork
This post on my medium account: https://medium.com/@warolv/building-the-ci-cd-of-the-future-nginx-ingress-cert-manager-945f3dc6b12e
Leave a comment